Posted by Aquajet Services on | Comments Off on Waterjet Cutting 18-Inch-Thick Stainless Steel
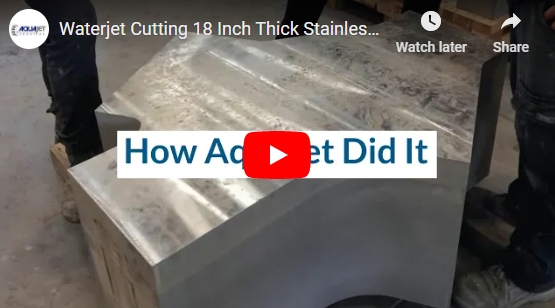
For this project, Strahman Valves needed a vendor capable of waterjet cutting 18-inch-thick blocks of type 316 stainless steel, weighing 8,300 lbs each. Accurately cutting metal of that thickness is uncommon in the waterjet industry, so AquaJet Services reconfigured a waterjet machine and did test cutting in order to meet the requirements of the project.
AquaJet Services specializes in jobs like this—projects involving unique challenges and detailed communication with the customer. Finding creative solutions for diverse industries is our niche.
How AquaJet Did It
The 18-inch-thick stainless steel blocks created challenges due to their weight. Our waterjet department removed the structure of the table and bridge, and constructed a heavy-duty fixture welded to the floor of the waterjet tank. We constructed a special lifting device to lower pieces into the tank for cutting and to lift out the finished parts.
For most waterjet cutting, we use garnet abrasive due to its high level of hardness and its ability to produce precise results. Each block required 4,000 lbs of garnet abrasive and 35 hours of cutting time. The 18-inch material thickness is far beyond any standard waterjet cutting configurations. However, we were able to take this job because we have developed our own protocols to achieve the desired cut finish and accuracy in ultra-thick metals.
Each 18-inch-thick part had four big drop pieces cut off of it. Before cutting, our team welded D-rings onto each drop piece above its future center of gravity in order to lift it with the crane after cutting. The finished parts weighed 4,700 lbs each.
Why Turn to Us for Your Waterjet Cutting Needs
Waterjet cutting is a very versatile process, and AquaJet Services maximizes the possibilities of waterjet cutting through a deep understanding of the machinery and the process. Most of our design team has experience with waterjet cutting and fabricating, and conversely, most of the waterjet operators and fabricators are involved in CAD/CAM. This creates a deep end-to-end expertise that facilitates creative solutions to the unique challenges presented in a job like this. Strahman Valves has inspected the completed parts and is pleased with the quality and speed of the job.
Contact the AquaJet Team to Learn More
AquaJet is proud to serve a variety of clients with diverse requirements. Our team always strives to deliver high-quality products in reasonable timeframes. If you have questions about how AquaJet can help during your next project, contact our team today.
Posted by Aquajet Services on | Comments Off on Case Study: Tube Sculpture – Artist Emil Lukas
This unique art sculpture by Emil Lukas was built right here in our shop. The sculpture is 8’-9” tall x 12’ wide, and contains over 600 aluminum tubes. The tubes are touching in the back of the sculpture and spaced apart in the front with waterjet cut spacers, which forces the tubes into a spherical arrangement. The result is basically a very large lens which produces some incredible optical effects.
From the front, the sculpture is an opaque spherical wall with only a small cluster of tubes that you can see through. This cluster is like an eye that follows you around as you move and which grows or shrinks depending upon your proximity to the sculpture.
The opposite side of the sculpture provides an entirely different effect. The spherical arrangement of the tubes means that there is a point where the centerlines of all the tubes converge — the focal point of the lens. At this point, you can see through all of the tubes, and the sculpture becomes almost invisible.
As you move away from the focal point, your view once again is obstructed by the tubes but is replaced by other spectacular effects created by light passing through the tubes’ reflective interior. In this photo, you can distinguish the image of a person on the other side even though the person is partially hidden.
The guy in the red shirt is the artist, and the other guy is Jessiah (an employee of AquaJet).
Check out this short video of the tube sculpture being built, and pay special attention to the sparks falling down on the far side of the tubes. You don’t actually see the sparks, but wherever a spark goes past a tube, it lights up the entire tube, creating a beautiful cascade of colored lights!
Emil had been working at developing this type of sculpture before he ever knew about us. When he first contacted us, he had already built several large prototypes out of cardboard tubes and was ready to take it to the next level. He built the first aluminum version in his own shop. Initially, our only involvement was waterjet cutting the tube spacers, but we ended up also fabricating the bases, as well as using our 3D software to aid in the design of the sculpture.Shortly after Emil finished up the first sculpture, he decided to start on the second one, but this time he wanted us to build it. We didn’t build it entirely on our own, of course. As the artist, it was Emil’s job to determine the placement of the tubes, especially as the sculpture neared completion. The job went exceptionally well, and Emil is already busy dreaming up future projects to do together.
It was definitely a pleasure working with Emil, and we very much look forward to working with him in the future.
Posted by Aquajet Services on | Comments Off on Case Study: Waspaloy Project
People often ask how thick we can cut with our waterjet, and it’s hard to know how to answer them, because the truth is that the slower you run your machine, the thicker you can cut. So, if you can figure out a way to get the material under your cutting head, you can cut through pretty much anything.
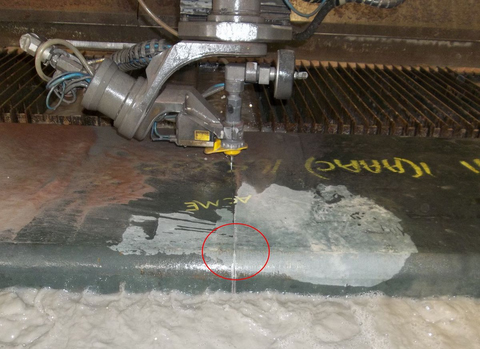
One of the thickest cutting jobs we’ve done was 16-½” thick Waspaloy, which is superalloy used in extremely high temperature applications like jet turbine blades. The material was in the form of a 10,000 pound billet, and all we were required to do was make three cuts across the width, severing it into four pieces.
Image 1 shows the waterjet in action. The red oval directs your attention to the way the kerf has completely closed up behind the stream due to residual stress within the material being relieved. Our customer had originally tried making the cuts with a bandsaw, but was unsuccessful because the saw blade got pinched so tightly that they ended up having to cut the blade and leave the captured piece stuck in the material.
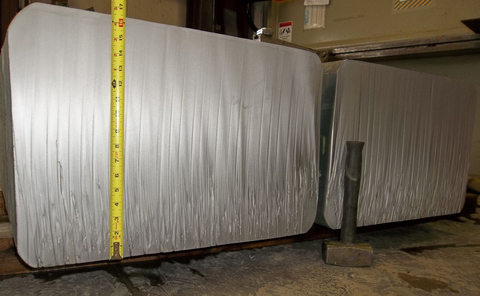
The greatest challenge we faced on this project is something that can be seen in Image 2. You can see linear marks every inch or so that start all the way at the top of the cut and extend to the bottom. We were quite perplexed because this is not normal behavior at all. The marks were obviously created by some kind of disturbance during the cut, but we were unable to determine the cause. We concluded that it could have been created by (1) a momentary interruption of the abrasive flow; (2) some type of inconsistency in the surface of the material, like a crack or a really hard chunk of metal, which could have deflected the stream; or (3) shifting of the workpiece.
The first option is very unlikely, because no abrasive problems were noticed before or after this job; also, abrasive problems generally aren’t sporadic. The second option is the one we have favored, although we weren’t able to see anything on the surface that would have deflected the stream. The third option didn’t immediately present itself to us for the simple reason that you wouldn’t really expect a 5 ton chunk of metal to move when it’s sitting securely on it’s base. However, it’s obvious from what can be seen in Image 1 that the billet was deforming as the stress was being relieved, so it might be possible that the movement was happening in tiny jerks rather than as a slow creep like you would sooner expect. So, while this option doesn’t seem very probable either, it does remain a possibility.
The reason these little marks were such a big deal is because they resulted in the billet not being completely separated at the bottom. Without being able to determine the source of the problem and fix it, we were left with the option of cutting a lot slower, which would have been very costly, or making each cut twice. We opted to make all the cuts once and then flip the entire billet upside down and cut through from the opposite side — at a much higher rate of speed this time — to finish severing the connected areas.
So we got through it and it was a good job in spite of the unforeseen challenges. And we learned some things! That’s worth something too. Sometimes you make a good profit and sometimes you don’t, but you can always learn something, and after all, learning is a type of profit.

 For this project, Strahman Valves needed a vendor capable of waterjet cutting 18-inch-thick blocks of type 316 stainless steel, weighing 8,300 lbs each. Accurately cutting metal of that thickness is uncommon in the waterjet industry, so AquaJet Services reconfigured a waterjet machine and did test cutting in order to meet the requirements of the project.
 The 18-inch-thick stainless steel blocks created challenges due to their weight. Our waterjet department removed the structure of the table and bridge, and constructed a heavy-duty fixture welded to the floor of the waterjet tank. We constructed a special lifting device to lower pieces into the tank for cutting and to lift out the finished parts.